History Change State and Virtual Pageviews
In this guide, we will explore how to configure the JENTIS Tag Manager to enable activation of data streams based on the Browsers History (Change) API (https://developer.mozilla.org/en-US/docs/Web/API/History_API). When using navigation on a website that doesn't reload the entire page, such as on Single Page Application websites, or when the URL changes without rendering a new page, there is a principle that always applies. In this guide, you will learn how to use the JENTIS data framework, including States, Triggers, Variables, and Tags, to maximize the intelligence of such a setup.
Prerequisites
Here we will cover some more background and setup information. What is the foundation, and what is the objective?
JENTIS has a framework consisting of State objects that determine the specific interactions that trigger a tracking response. The Browser History API is a suitable use case for this framework, as it provides notifications every time a Browser history state is updated. There are three types of Browser History states that JENTIS will work with: "pushState", "replaceState", and "popState".
The objective for our use case is to have clear indications for our tracking on the serverside when such virtual navigations happen. So, we can then trigger tags to submit data to any endpoint.
In this guide we will create the following JENTIS elements to reach our goal:
a state: this builds the foundation and defines when to activate our tracking
Variables: these will contain information on the context of what was observed exactly (a new URL value, a hint on what history state was observed)
Trigger: here we can define further conditions to look for and activate a tag
Tag: this element holds the configuration actually to submit data to our destination
History Change Configuration
In the following we will create a JENTIS State, then utilize those to read variable values and create a trigger to activate a tag to stream data to a Tool.
Create a JENTIS State
The foundation of the desired outcome is rooted on the activation of JENTIS at the right moment. This is where the Browsers history API comes into play. This framework within a users browser will make sure we get a call when there is a relevant update, ie. a navigation where the URL changed accordingly.
To enable this fist building block please navigate to the "State" section in your JENTIS account. There you must add a new state.
Please copy and paste the following code accordingly.
function(initState){
  var pushState = history.pushState;

  //generate this object with the mentioned properties in an appropriate scope
  var optionalParamObj = {};

  //resetting the JENTIS Data Layer is mandatory as with each state data is pushed
  //to the data layer that must be reset for the next state
  optionalParamObj.stateCallback = function() {
    window.jentis.tracker.resetDatalayer();
  }

  history.pushState = function(){
    pushState.apply(history, arguments);

    if(arguments && arguments[2]){
      _jts.push({
        track:"virtualPageView",
        virtualPagePath : arguments[2],
        historyStateName: "pushState"
      });
      initState(optionalParamObj);
    }
  }

  var replaceState = history.replaceState;
  history.replaceState = function(){
    replaceState.apply(history, arguments);

    if(arguments && arguments[2]){
      _jts.push({
        track:"virtualPageView",
        virtualPagePath : arguments[2],
        historyStateName: "replaceState"
      });
      initState(optionalParamObj);
    }
  }

  window.addEventListener('popstate', function (event) {
      if (event.state) {
          if (typeof lastPage === "undefined" ||
              typeof event.target !== "undefined" &&
              typeof event.target.document !== "undefined" &&
              typeof event.target.document.location !== "undefined" &&
              typeof event.target.document.location.pathname !== "undefined") {
            _jts.push({
              track:"virtualPageView",
              virtualPagePath : event.target.document.location.pathname,
            historyStateName: "popState"
            });
            initState(optionalParamObj);
          }
      } else if (event.state === null) {
        _jts.push({
          track:"virtualPageView",
          virtualPagePath :document.location.pathname+document.location.search,
          historyStateName:"popState"
        });
        initState(optionalParamObj);
      }
  }, false);
}
This will activate JENTIS at the moment a history change is triggered via a 'popstate', 'pushState' or 'replaceState'. Additionally we will push a document with properties to the JTM data model:
track: "virtualPageView" (document)
virtualPagePath (property that contains the new URL path, w/o the hostname)
historyStateName (property that contains the history state name 'popstate', 'pushState' or 'replaceState')
Now we need to put all of this into action.
Create JTM Data Layer Variables
As mentioned in the previous step there are two properties of interest pushed with the new JTM State: virtualPagePath and historyStateName. Please add the following two frontend variables that will read out the dynamic values of those variables.
Read here more on the concept of the JENTIS Data Layer.
Navigate to the Data Sources: Variables section in your JENTIS account. Add the following to your configuration:
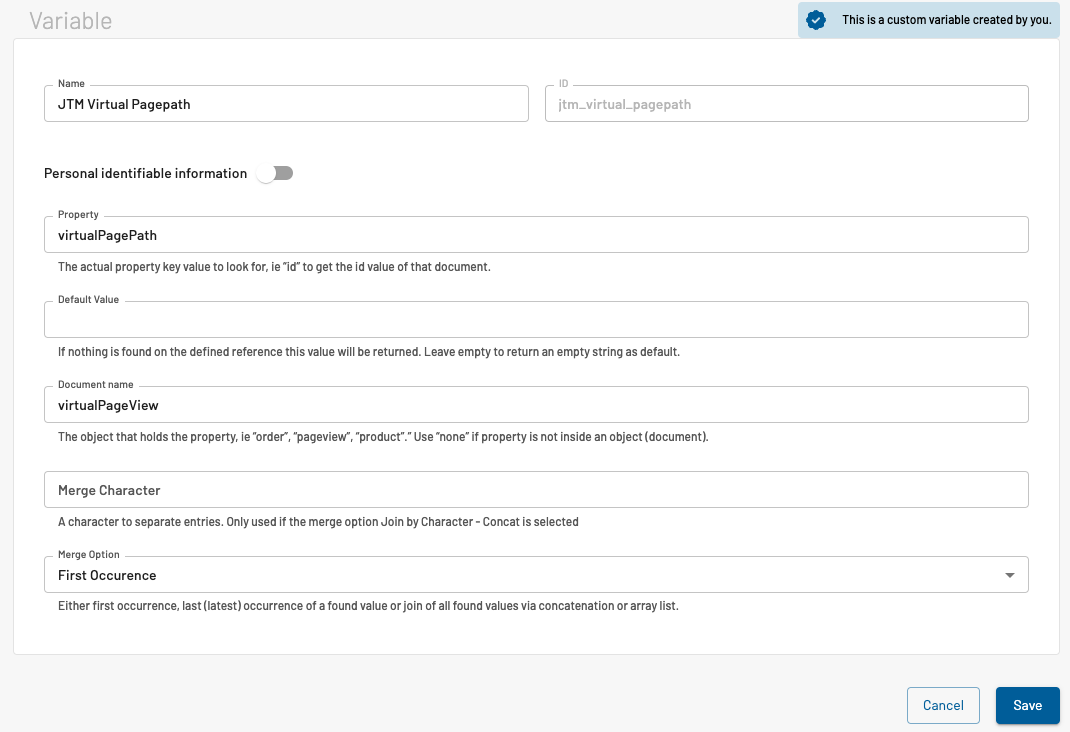
The name can be defined to any meaningful value, in our example here we suggest to use "JTM Virtual Pagepath" and "JTM History Change State" to quickly recognize those custom elements.
Please use the property key "virtualPagePath" and "historyStateName" as defined in the previous step. Those properties are pushed along side the document "virtualPageView". Which is also the configuration for the "Document name" in the frontend variable definition.
The occurrence pointer must define "last", as only the most recent value should be reported. Though in our case it is unambiguous (both, "last" and "first", would return the same).
You should now have two new variable elements in your JENTIS account, so let's head on and finish the setup in the next step.
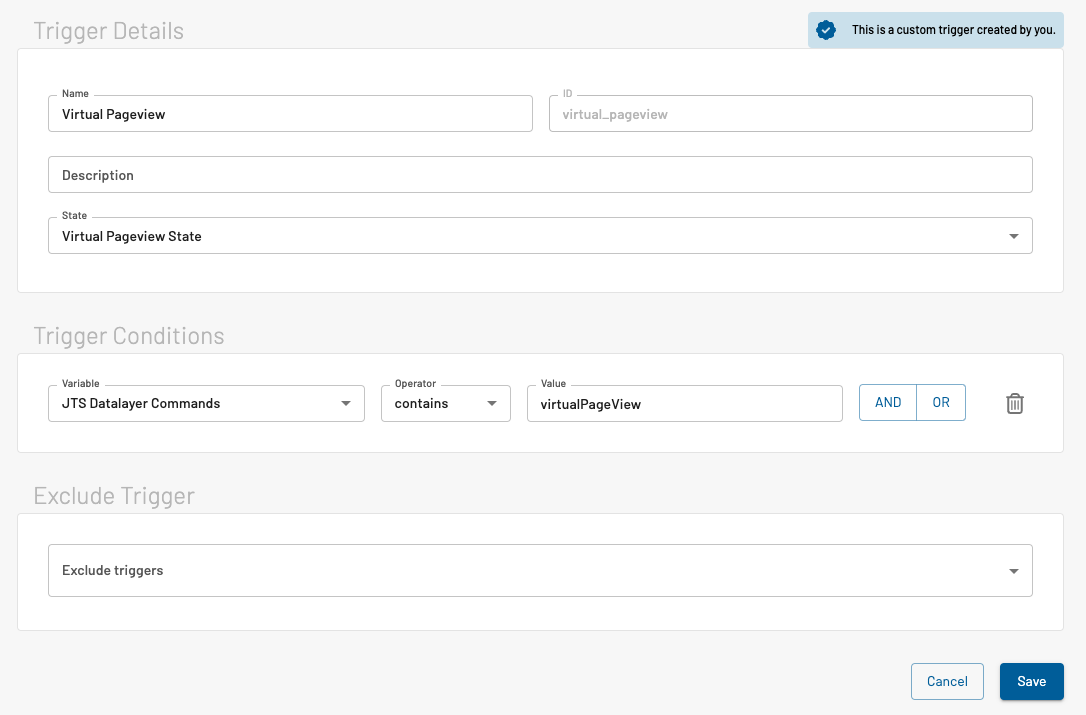
Create a Trigger and Tag
Next we want to actually get working with the variables and state we just created. They are the foundation and meant to be used in a trigger (that holds conditions) and tag to send data to a tool.
First a trigger must be configured that is connected to our state from the previous steps:
Now you just need to create a tag for the tool in need, where you will select the trigger you just created. With that you are ready to go and preview your setup!