App Tracking: Getting Started
This article outlines how the JENTIS App SDK works and provides a guide on how to install it on your application. Expertise in app development will be needed for this.
Data Workflow
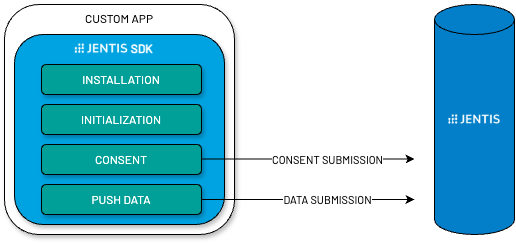
With the JENTIS App SDK, you can seamlessly track data from iOS and Android platforms to the JENTIS environment. Transmitting this data to JENTIS allows you to leverage all tools configured for server-side execution and have unified management of your data tracking across all platforms.
It's important to highlight that there is no reverse communication or data loading from JENTIS into your App. Instead, the JENTIS App SDK enables data tracking by organizing data streams and sending them to JENTIS in the appropriate format, meaning the communication flows only from the App to JENTIS.
With the JENTIS App SDK, you have complete control over what data is transmitted from your App, ensuring compliance and transparency in data management.
These are the steps to start App Tracking with JENTIS:
Install the JENTIS App SDK in your application - available for iOS and Android.
Initialize the JENTIS App SDK with the appropriate container settings for tracking data.
Manage consent for your various vendors to comply with privacy regulations.
Use the data layer to send data to JENTIS.
Before you start: JENTIS Container Setup
We recommend splitting configurations for different platforms into separate containers. This is because the configuration of connectors may differ between placeholders for Web and App tracking, which could lead to conflicts or misconfigurations if combined.
Create a new container exclusively for App Tracking in the JENTIS Platform following these steps.
Install the JENTIS SDK to your App
For iOS:
Using Swift Package Manager, add JentisSDK as a dependency in your Package.swift file:
dependencies: [
    .package(url: "https://github.com/JENTISDev/jentis-sdk-ios-releases.git", from: "1.0.0")
]
Manual Integration
Download JentisSDK.xcframework and add it to your project dependencies.
For Android:
Using Gradle, add JentisSDK as a dependency in your project’s build.gradle file.
With Kotlin DLS
dependencies {
    implementation("com.github.JENTISDev:jentis-sdk-android:2.0.6")
}
With Groovy DLS
dependencies {
    implementation 'com.github.JENTISDev:jentis-sdk-android:2.0.6'
}
Ensure that your project-level settings.gradle.kts file contains the required repositories for dependency resolution. Add the following configuration:
dependencyResolutionManagement {
    repositoriesMode.set(RepositoriesMode.FAIL_ON_PROJECT_REPOS)
    repositories {
        google()
        mavenCentral()
        maven {
            url = uri("https://jitpack.io")
            credentials { username = "jp_gcs6hkvne2f97jdnosqm6mgnm3" }
        }
    }
}
After adding the dependencies and configuring the repositories, sync your project to download and include the SDK in your build.
Initialize the JENTIS App SDK
For the next step, you must find some properties on your JENTIS Account and use them to configure the tracking parameters. Before utilizing the SDK, it must be configured with tracking parameters. This configuration should be done at the start of your application, typically within the Application class.
Property | Mandatory | Description |
|---|---|---|
trackDomain |
| The track domain is the endpoint to which the data should be sent from the JENTIS App SDK. It is a combination of:
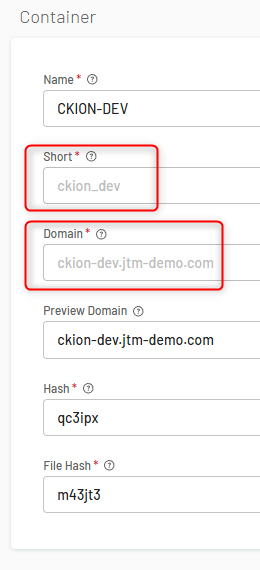
For example: You can find this information in your JENTIS Account under Settings > Containers, by clicking on the respective container.  |
container |
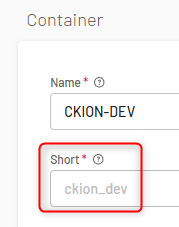
| Please enter the Container ID or Short ID here. You can find this information in your JENTIS DCP under Settings > Containers by clicking on the respective container.  |
environment |
| JENTIS supports the environments “live” and “stage”. Please enter the environment you wish to use. |
authorizationToken |
|
Please contact the JENTIS Helpdesk to receive an authorization token! |
version | (optional) | Indicates the version you want to preview using the SDK. If no value is provided, the latest published version will be used automatically. Values are provided with “major” versioning from JENTIS in the format “1”, “2”,”3”, … Read next: App Tracking: Troubleshoot |
debugCode | (optional) | When using a preview, you can find the Read next: App Tracking: Troubleshoot |
sessionTimeoutInSeconds | (optional) | By default, the session timeout is set to 1800 seconds. You can override this value by adding this property and setting it to your desired value. |
customProtocol |
| By default, the https:// protocol is used for sending data. In some experimental cases, you may need to set a different value here. |
Edit the code below with the respective properties mentioned above:
iOS Setup
Before using the SDK, configure it with a TrackConfig instance. This should be done in the app’s startup code, typically in AppDelegate or the SwiftUI @main struct.
import JentisSDK

@main
struct MyApp: App {
    init() {
        let config = TrackConfig(
            trackDomain: "tracking.yourdomain.com",
            container: "your-container",
            environment: .live, // live or stage
            version: "1",
            debugCode: "optional-debug-code",
            sessionTimeoutInSeconds: 1800,
            authorizationToken: "123abcdefgh456token",
            customProtocol: "https",
            enableOfflineTracking: true,
            offlineTrackingTimeout: 7200
        )
        JentisService.configure(with: config)
    }
    // ...
}
Android Setup
Before using the SDK, it must be configured with tracking parameters. This configuration should be done at the start of your application, typically within the Application class.
import com.jentis.sdk.jentissdk.JentisTrackService
import okhttp3.OkHttpClient

class MyApp : Application() {
    override fun onCreate() {
        super.onCreate()

        val okHttpClient = OkHttpClient()

        // Initialize tracking service
        JentisTrackService.initialize(this, okHttpClient).apply {
            initTracking(
                application = this@MyApp,
                trackDomain = "tracking.yourdomain.com",
                container = "your-container",
                environment = "live", // options: live or stage
                version = "1",
                debugCode = "optional-debug-code",
                authToken = "123abcdefgh456token",
                sessionTimeoutParam = 180,
                protocol = "https",
                enableOfflineTracking = true, // If the device is offline, the request is cached if this parameter is true
                offlineTimeout = 3600 // seconds
            )
        }
    }
}
Read next
If you have any questions or suggestions, contact us through our Helpdesk.

