How to test if CMP is correctly linked to DCP
What is the Problem?
After implementing a connection between your CMP (Consent Management Platform) and JENTIS, you may want to test the integration to ensure it functions correctly. However, you might encounter challenges when checking the preview or experiencing unexpected results during testing. The following points highlight common issues that may arise:
Debugging CMP Connection: Verifying the successful connection between your CMP and JENTIS may pose difficulties, especially when you need to examine consent data in the developer tools.
Understanding Consent Information: Interpreting the consent data retrieved from "jentis.consent.data" in the local storage can be unclear, making it challenging to comprehend the user's consent status.
Unexpected Results: During CMP testing, unexpected outcomes might occur, such as incorrect consent values or tools not functioning as expected.
What is the Solution?
Follow these steps to address the issues related to testing your CMP integration in JENTIS:
Start Debug Session: To verify the CMP integration, begin a debug session, preferably in an incognito window. This ensures that no cookies or storage objects interfere with the testing process.
Open Developer Tools: Once your page loads, open the developer tools in your browser. Under the application menu point, navigate to the local storage section to find the object with the Key named "jentis.consent.data." This data represents the current consent status.
Interpreting Consent Data: Observe the "jentis.consent.data" object and its keys to understand the consent status. Note that the "lastupdate" key's value will vary based on the time, and the "vendorsConsentMode" key will differ depending on the tools implemented in your setup.
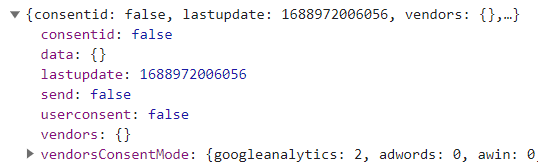
Consent Values: When interacting with the consent bar, the "vendors" key will be updated to reflect JENTIS's consideration of consent information. The possible values are:
"true": Consent was provided by the user for a specific tool.
"false": Consent was declined by the user (not interacting with the consent bar).
"ncm": Consent was declined, but there is an essential mode configuration for the tool.
Troubleshoot Unexpected Results: If you encounter unexpected results or issues during CMP testing, open a ticket through the helpdesk portal. Inform the customer service team about the problem, and they will assist you in resolving the issue promptly.
Summary:
Creating a new container in JENTIS involves testing the connection between your CMP and JENTIS to ensure a smooth integration. Debugging the CMP connection can be done in an incognito window while analyzing the consent data in the developer tools. Interpreting the consent information retrieved from "jentis.consent.data" helps understand the user's consent status. If you encounter unexpected results or issues during CMP testing, don't hesitate to reach out to our customer service team through the helpdesk portal for swift assistance and resolution. With these steps and support, you can effectively test and troubleshoot your CMP integration in JENTIS to provide seamless user experiences.