Timer Actions Custom State
Timing an event or waiting for some result can be a tricky challenge in the asynchronous world of JavaScript. Hence callbacks, promises and event-listeners are the best practice to keep everything running smoothly. However that is not always possible. So here come timings and intervals into play, that are more primitive but can be a good help in tag management.
Timing States in JENTIS Tag Manager
With the concept of JENTIS State we can invoke our tracking at certain situations and events. Timing is no different. So we will use that existing framework in your JENTIS implementation to activate a trigger after some time-interval loops.
To make this interval looping even more capable, there will be also an option to continue the loop on an entire session (and not just the current page)—more on that in the detailed description below.
For that to activate in your JTM account you need to add a new custom state. Navigate to the "JENTIS Tag manager: States" section and add a new element.
In the "JavaScript Code" text field input paste the following - a quick walkthrough to the code is found below:
function(initState){
  var INTERVAL_TIME_MS = 1000;  // interval timing in millisec
  var LOOPS_COUNTER    = 10;    // number of intervals
  var SESSION_INTERVAL = false; // true to keep the interval and loop counter within the session storage

  // DO NOT CHANGE THE FOLLOWING SECTION
  var SESSION_STORAGE_NAME = "jts_interval_loop_counter";
  if(SESSION_INTERVAL === true){
    let s_counter = sessionStorage.getItem(SESSION_STORAGE_NAME);
    LOOPS_COUNTER = s_counter ? parseInt(s_counter) : LOOPS_COUNTER;
  }
  //generate this object with the mentioned properties in an appropriate scope
  var optionalParamObj = {};

  //resetting the JENTIS Data Layer is mandatory as with each state data is pushed
  //to the data layer that must be reset for the next state
  optionalParamObj.stateCallback = function() {
    window.jentis.tracker.resetDatalayer();
  }

  if(LOOPS_COUNTER > 0){
    var int_id = setInterval ( function() {
      _jts.push({
        track: "interval",
        int_timer: INTERVAL_TIME_MS,
        int_count: LOOPS_COUNTER
      });

      initState(optionalParamObj);

      LOOPS_COUNTER--;

      sessionStorage.setItem(SESSION_STORAGE_NAME, LOOPS_COUNTER);

      if (LOOPS_COUNTER <= 0) {
        clearInterval(int_id)
      }
    }, INTERVAL_TIME_MS);
  }
}
Inside the code block feel free to customize those options:
INTERVAL_TIME_MS is an integer value that indicates the interval time per loop in milliseconds (ie. "1000")
LOOPS_COUNTER is an integer value that counts the number of loop iterations, we strongly recommend to set this value and not to intentionally run the loop infinite times, a value below 1 will activate the interval a single time and any non-integer value will break this JENTIS State execution
SESSION_INTERVAL is a boolean value that describes if you intend to preserve the counter for a session (definition: https://developer.mozilla.org/en-US/docs/Web/API/Window/sessionStorage), if set to true this loop will only activate once per session per user, otherwise it is reset on each page navigation
Complete the Implementation
There are also some more elements that you can add to this implementation. Within the JENTIS State code we also pushed two custom properties that can be used in triggers and tags:
int_count: the current intervals counter value
int_timer: the interval timer value
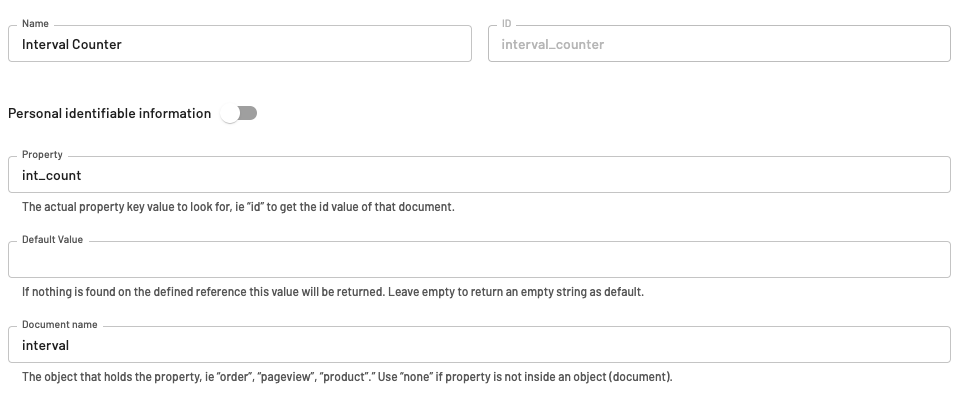
Let's add a variable that reads for each interval the current interval count. Navigate to the "Data Sources: Variables" section in your JTM and add a new "Get JTM data layer value" variable.

In that variable you can read what was pushed in the according JTM State we created in the steps before:

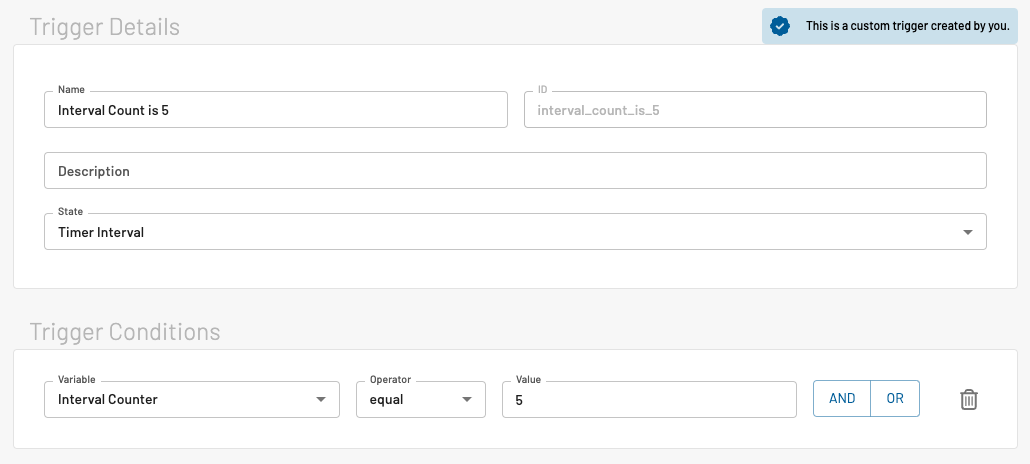
Now this variable comes in handy, ie. for triggers and tags. So you can activate a tag after a set interval. In the following screenshot we defined a trigger condition to activate when the counter is exactly 5.

Now it is up to you to actually put all those elements into use on your implementation.
