Optimizing Form Submission Insights with JENTIS and Cross Engage
In the realm of digital analytics and marketing, understanding user interactions, especially form submissions on a website, is crucial for enhancing user engagement and personalizing user experiences. The JENTIS Data Capturing Platform introduces a refined method for capturing these pivotal interactions, whily focusing on user respect and data privacy.
Cross Engage Integration with JENTIS Data Capture Platform
CrossEngage is a Customer Data Platform (CDP) that integrates customer data across various sources to provide a unified customer view. It enables marketers to orchestrate and personalize customer interactions across channels in real-time, based on the comprehensive understanding of customer behaviors and preferences. CrossEngage focuses on enhancing customer engagement by leveraging data-driven insights to create tailored marketing campaigns and messages.
By providing a centralized platform for managing customer data, CrossEngage helps businesses break down silos between different data sources and tools, ensuring a consistent and personalized customer experience across all touchpoints.
JENTIS has a native integration for Cross Engage with a dedicated connector. Here we will focus on the ‘identify’ and ‘update’ events to submit customer specific data.
Elevating Form Submission Insights
At the core of the JENTIS Data Capturing Platform is the capability to recognize and respond to form submission events on a website. This process is designed to activate specific tags, such as the "Cross Engage Identify" tag, at the critical moment a user decides to engage by submitting a form. This method ensures that businesses can gather insights into user preferences and behaviors in a respectful and compliant manner.
The goal of this article is to make the most of a Cross Engage integration on a website. For this we will listen to form submissions and look specifically for “email” input fields in that forms HTML. With this all at hand we can provide the most accurate data to activate with Cross Engage.
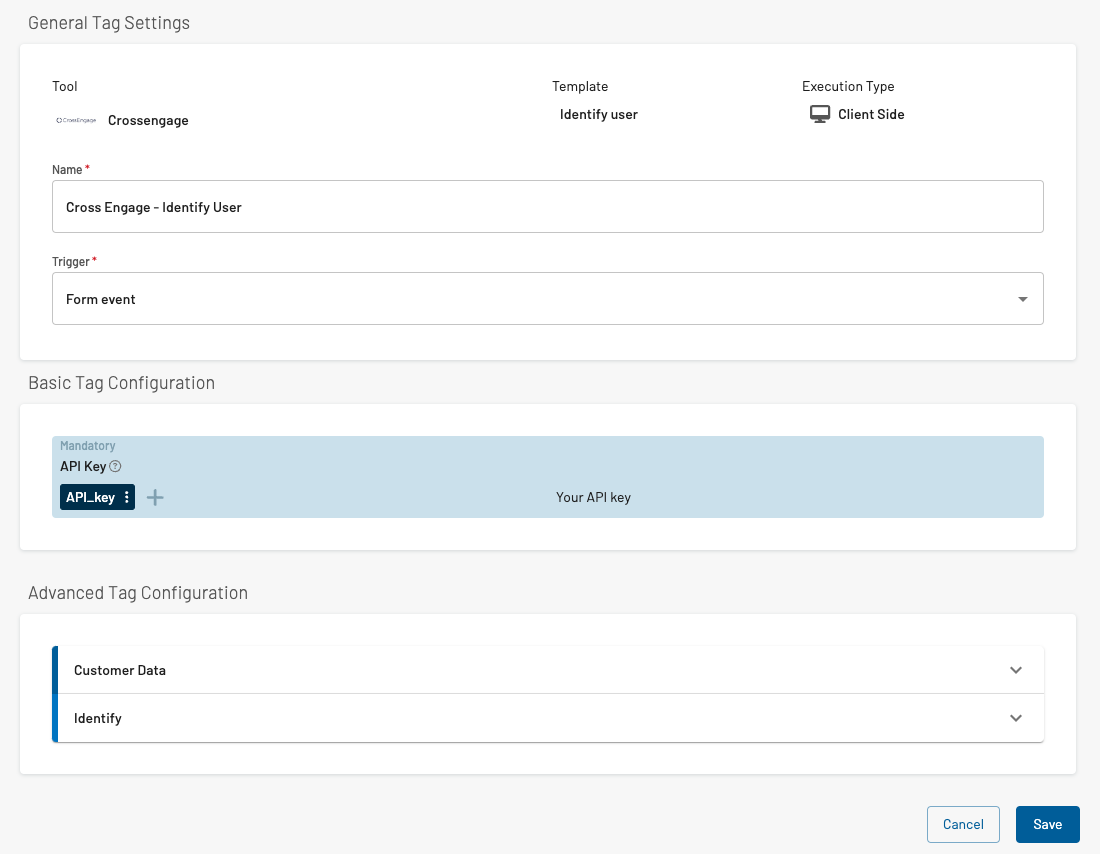
To get us started we will add the according tag with Cross Engage installed in a JENTIS account.

The crucial parts that are yet missing in your configuration possibly, which are:
the right trigger (“Form event”) and
the properties of the user (the email-address value but possibly also other like first and last name, address etc).
So the next logical step is to get both implemented for a correct and working configuration.
Identifying Email-Input Fields for Enhanced Data Accuracy
One of the standout features of this approach is its ability to identify email-input fields within submitted forms accurately. By focusing on these fields, the JENTIS Data Capturing Platform can provide businesses with the most relevant and precise data to fuel their Cross Engage activities. This precision is instrumental in tailoring communications and offers to meet the individual needs and interests of users, thereby fostering a more personalized and engaging user experience.
Navigate to the JENTIS Tag Manager: Variables section. Here add a new “Custom JavaScript” variable.
The name might be something like “Form - Input Email”. The content of the JavaScript is the following.
In short: it will grab on an event (that is defined by the trigger in the next step) and access the events object model, which in that case is the form. It then iterates the input fields of the form and looks for “input type=email”. If such an input is found it will return the content of said input field. Which works a general solution with all regular HTML forms, as this input type is a standardized element.
function(stateContext){
  var form = stateContext.element;

  function getEmailInputValue(formElement) {
    // Check if the provided element is indeed a form
    if (!formElement || formElement.tagName !== 'FORM') {
        console.error('The provided element is not a form.');
        return null;
    }

    // Find all input elements within the form
    const inputs = formElement.getElementsByTagName('input');

    // Iterate over the input elements to find the one of type email
    for (let i = 0; i < inputs.length; i++) {
        if (inputs[i].type === 'email') {
            // Return the value of the first email input found
            return inputs[i].value;
        }
    }

    return null;
}

  return form ? getEmailInputValue(form) : null;
}
Further you maybe want to access other properties of the same form, too, right? Ideas might range from inputs of name, address, zip code and much more.
Here is an example that identifies the input based on a generic attribute data-testid which is often found with frontend website frameworks and tools. Possibly you can also customize this approach to create custom variables to access relevant properties of your form.
Again the procedure is the same, add a new variable and give it a proper name. The following code will return the value of the input with the data-testid “firstName”.
function(stateContext){
  var form = stateContext.element;

  var data_testid_identifier = "firstName";

  function getEmailInputValue(formElement, id) {
    // Check if the provided element is indeed a form
    if (!formElement || formElement.tagName !== 'FORM') {
        console.error('The provided element is not a form.');
        return null;
    }

    // Find all input elements within the form
    const inputs = formElement.getElementsByTagName('input');

    // Iterate over the input elements to find the one that matches the testid
    for (let i = 0; i < inputs.length; i++) {
        if (inputs[i].attributes &&
            inputs[i].attributes["data-testid"] &&
            inputs[i].attributes["data-testid"].value === id) {
            // Return the value of the first email input found
            return inputs[i].value;
        }
    }

    return null;
}

  return form ? getEmailInputValue(form, data_testid_identifier) : null;
}
Adding the Trigger
Now the only part missing is the trigger which activates the tag. We already had a sneak peak on it in the screenshot of the tag: “Form event”.
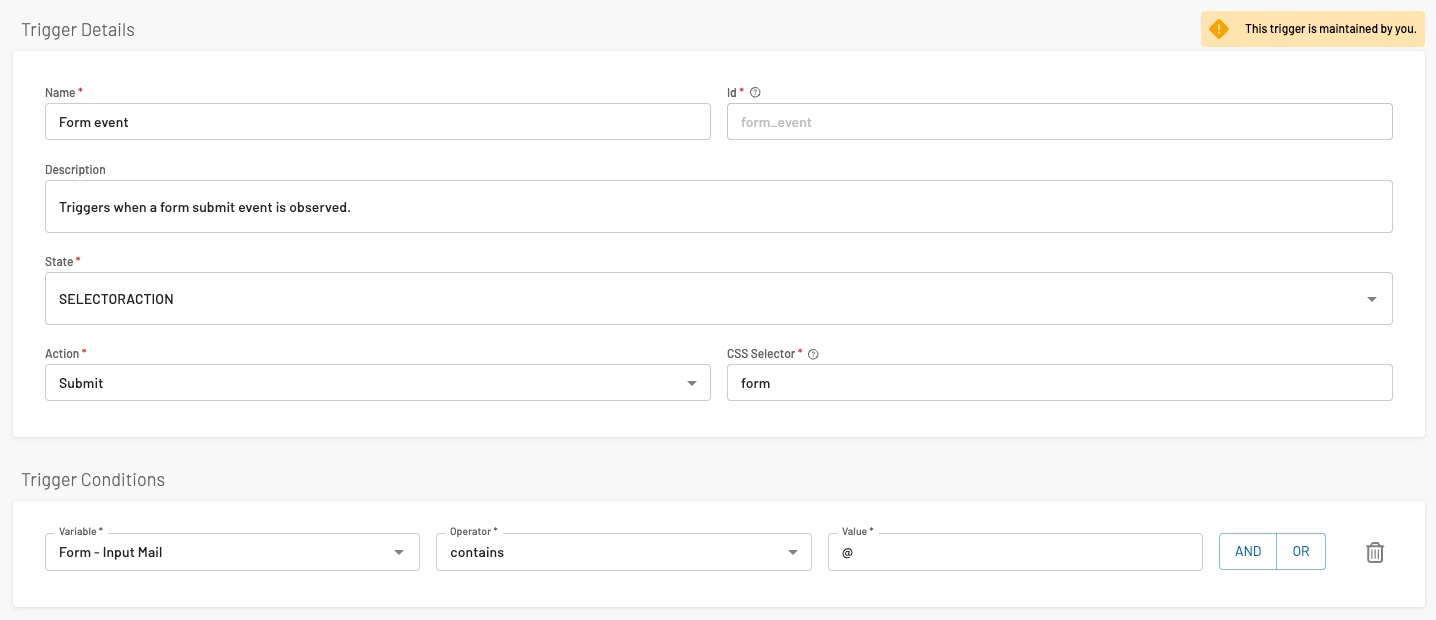
This is a default “SELECTORACTION” trigger with the following configuration. You must navigate to the JENTIS Tag Manager: Trigger section and add a new trigger that looks like the following:

This will activate on the “submit” event in a users browser. The CSS selector is a generic “form” value, meaning that all HTML form tags will trigger with this definition. Further we evaluate the “Form - Input Email” with the condition to contain a @ character. So we are sure it looks like an email-address.
With that we have all parts now configured to get this tag running. You only have to add all the variables you just created (like the email-address value) to the Cross Engage tag, so it will actually submit the value when triggered. Make the same with all the variables possibly created that contain relevant data.
How It Works and Conclusion
When a form submission event is detected, the platform dynamically activates the "Cross Engage Identify" tag. This tag then processes the form, specifically extracting information from email-input fields. The outcome is a robust dataset that businesses can utilize to enhance their engagement strategies.
The JENTIS Data Capturing Platform offers a sophisticated solution for businesses looking to enhance their understanding of user interactions on their websites, specifically form submissions, without compromising on privacy or resorting to intrusive methods. By activating the "Cross Engage Identify" tag upon form submissions and focusing on the most relevant data fields, businesses can achieve a deeper engagement with their users. This approach not only respects user privacy but also aligns with the modern need for personalized user experiences, making it an invaluable tool in the digital marketing landscape.
