> For the complete documentation index, see [llms.txt](https://docs.jentis.com/llms.txt). Markdown versions of documentation pages are available by appending `.md` to page URLs; this page is available as [Markdown](https://docs.jentis.com/data-capture/shop-system-setup/shopify.md).
# Shopify
## What is the Shopify Custom Pixel
Shopify Custom Pixel is a feature that allows merchants to create and integrate custom tracking pixels on their Shopify store. These pixels help track specific events, user behavior, and conversions, providing valuable data for analytics and marketing purposes. Unlike standard pixels, custom pixels offer greater flexibility, enabling merchants to tailor their tracking to meet specific business needs or integrate with third-party services not natively supported by Shopify. This feature is particularly useful for advanced marketing strategies and detailed customer insights.
To get started swiftly, ensure you have the following prerequisites:
* Shopify Site
* JENTIS Account
* At least one container within the JENTIS Account
## Installation Steps
### Shopify Store: Custom Pixel
1. **Log into your Shopify account.**
2. Navigate to **Settings > Customer Events.**
3. Press **Add custom pixel** and define a good name f.e. **JENTIS**.
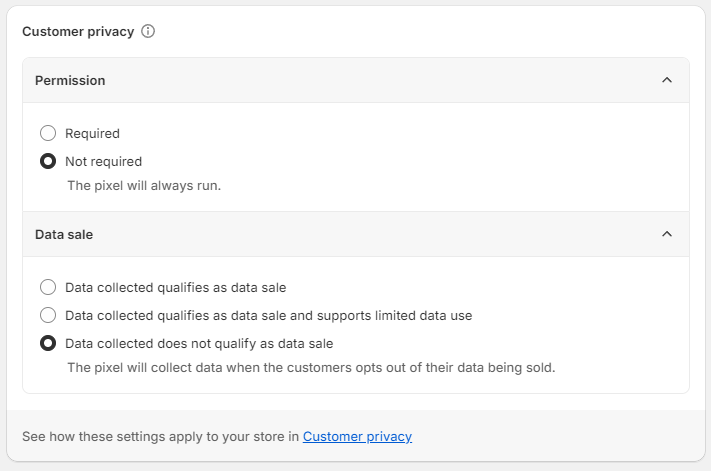
4. Set the settings the following way:
5. Add in the Codeblock the following code:
{% code overflow="wrap" lineNumbers="true" %}
```javascript
window.jentisApp = window.jentisApp || {};
//Instruct JENTIS to set all cookies via an alternative method.
window.jentisApp.cookieSettingMethod = window.jentisApp.cookieSettingMethod || setShopifyCookie;
window.jentis = window.jentis || {};
window.jentis.shopifyApp = window.jentis.shopifyApp || {};
window.jentis.shopifyApp.isJentisLoaded = false;
window.jentis.shopifyApp.dcp = window.jentis.shopifyApp.dcp || {};
// Please adapt the DCP-Configuration to your needs!
window.jentis.shopifyApp.dcp.domain = "intercontinentalgrid.org";
window.jentis.shopifyApp.dcp.hash = "9sc4rl";
window.jentis.shopifyApp.dcp.short = "shopify-teststore-001";
window.jentis.shopifyApp.dcp.filehash = "gbujzl";
window.jentis.shopifyApp.dcp.environment= "live";
window.jentis.shopifyApp.analytics = window.jentis.shopifyApp.analytics || [];
window.jentis.shopifyApp.customerPrivacy = window.jentis.shopifyApp.customerPrivacy || [];
window.jentis.shopifyApp.createObservableArray = function(baseArray) {
var observableArray = {
array: baseArray,
observers: []
};
observableArray.addObserver = function(observer) {
this.observers.push(observer);
for (var i = 0; i < this.array.length; i++) {
observer(this.array[i]);
}
};
observableArray.push = function() {
var items = Array.prototype.slice.call(arguments);
var result = Array.prototype.push.apply(this.array, items);
for (var i = 0; i < this.observers.length; i++) {
this.observers[i].apply(null, items);
}
return result;
};
return observableArray;
}
window.jentis.shopifyApp.customerPrivacy = window.jentis.shopifyApp.createObservableArray(window.jentis.shopifyApp.customerPrivacy);
window.jentis.shopifyApp.analytics = window.jentis.shopifyApp.createObservableArray(window.jentis.shopifyApp.analytics);
this.customerPrivacy.subscribe('visitorConsentCollected', (event) => {
window.jentis.shopifyApp.customerPrivacy.push(event);
});
var initialPrivacy = init && init.customerPrivacy;
if (initialPrivacy) {
window.jentis.shopifyApp.customerPrivacy.push({
customerPrivacy: initialPrivacy
});
}
analytics.subscribe('all_events', (event) => {
window.jentis.shopifyApp.analytics.push(event);
});
window.jentis.shopifyApp.loadJENTISScript = function() {
(function(cdnBaseUrl, projectId, workspace, version) {
var PKEY = "jts_preview_version";
var V = "_";
try {
version = window.sessionStorage.getItem(PKEY)|| window.localStorage.getItem(PKEY) || version;
} catch (e) {}
var hasVersion = version !== V;
var cdnhost = hasVersion ? cdnBaseUrl + "/get/" + workspace + "/web/" + version + "/" : cdnBaseUrl + "/";
var env = hasVersion || workspace === "live" ? "" : "?env=" + workspace;
window.jentis = window.jentis || {};
window.jentis.config = window.jentis.config || {};
var cfg = window.jentis.config.frontend = window.jentis.config.frontend || {};
cfg.cdnhost = cdnhost;
cfg.vers = version;
cfg.env = workspace;
cfg.project = projectId;
cfg.version = "2";
window._jts = window._jts || [];
var f = document.getElementsByTagName("script")[0];
var j = document.createElement("script");
j.async = true;
j.src = cdnhost + window.jentis.shopifyApp.dcp.filehash + ".js" + env;
f.parentNode.insertBefore(j, f);
})("https://" + window.jentis.shopifyApp.dcp.hash + "." + window.jentis.shopifyApp.dcp.domain,window.jentis.shopifyApp.dcp.short,window.jentis.shopifyApp.dcp.environment, "_");
}
function setupJentisTrackingCode() {
if (
typeof window.jentis.shopifyApp.isJentisLoaded !== 'undefined' &&
!window.jentis.shopifyApp.isJentisLoaded
){
window.jentis.shopifyApp.loadJENTISScript();
window.jentis.shopifyApp.isJentisLoaded = true;
}
}
function setShopifyCookie(cookie){
if(
typeof browser !== 'undefined' &&
typeof browser.cookie !== 'undefined' &&
typeof browser.cookie.set === 'function'
){
browser.cookie.set(cookie);
}
}
setupJentisTrackingCode();
```
{% endcode %}
In the previous code, make sure to replace the following values with the according values from your container settings:
```javascript
// Please adapt the DCP-Configuration to your needs!
window.jentis.shopifyApp.dcp.domain = "intercontinentalgrid.org";
window.jentis.shopifyApp.dcp.hash = "9sc4rl";
window.jentis.shopifyApp.dcp.short = "shopify-teststore-001";
window.jentis.shopifyApp.dcp.filehash = "gbujzl";
window.jentis.shopifyApp.dcp.environment= "live";
```
You can find your container settings in your JENTIS platform under **Containers > Setup.** Select the container associated with your Shopify shop.
For the `short` value use the container ID as presented in the screenshot (ie. "jtm\_demo\_com"):
For the following values you'll find them within the Tracking Code snippet:
* `hash` is the sub-domain section generated with your JENTIS Container (equivalent to the DNS A Record value), in example: `kndmjh`
* `domain` is the full origin where the DNS A record is living, in example: `mision.jtm-demo.com`
* `filehash` is the name of the `.js` file, ie. `2d23ag`
* `environment` can be static `live` and used with all environments (optionally use `stage` and `live` dynamically based on your own rules, so you can publish different testing versions with your site)
6. **Save** the custom pixel.
### JENTIS Platform: Install the Shopify Plugin
1. Open your JENTIS platform and navigate to **Server Tag Manager > Plugins.**
2. Click on **Add New Plugin**.
3. Select the **Shopify Datalayer-Bridge**.
4. Define a good **name** and connect it to the right **container.**
### JENTIS Platform: Create a Variable
In the JENTIS Platform, you might need to create an additional variable to retrieve the correct currency from the webpage.
By default, Tools in JENTIS use the Currency global variable. The value (e.g., EUR) set into this global variable is a constant available for all tools in the same Container.
However, based on the visitor's browser localization, your webpage could automatically change prices and currencies on product-related pages. For example, a user visiting [www.example.de](http://www.example.de/) from the United Kingdom, but instead of redirecting to the UK domain, Shopify changes the currency from EUR to GBP and the prices accordingly. The global currency variable will still give EUR, leading to data discrepancies in your analytics tools.
To overcome this situation, you must use the following code to create a Client-side Javascript variable that will dynamically retrieve the most up-to-date currency value from the webpage.
In your JENTIS Platform, go to **Server Tag Manager** → **Variables**. Click on **Add New Variable** → **Client-side** → **Client-side Javascript Code**, and copy-paste the following code:
```javascript
function(oArgs){
if (
typeof window.ShopifyAnalytics !== "undefined" &&
typeof window.ShopifyAnalytics.meta !== "undefined" &&
typeof window.ShopifyAnalytics.meta.currency !== "undefined"
){
return window.ShopifyAnalytics.meta.currency;
}
if (
typeof window.Shopify !== "undefined" &&
typeof window.Shopify.currency !== "undefined" &&
typeof window.Shopify.currency.active !== "undefined"
){
return window.Shopify.currency.active;
}
function findKey(obj, targetKey) {
if (typeof obj !== 'object' || obj === null) return null;
for (var key in obj) {
if (key === targetKey) {
return obj[key];
}
if (typeof obj[key] === 'object') {
var result = findKey(obj[key], targetKey);
if (result !== null) return result;
}
}
return null;
}
var allProducts = window.jentis.tracker.getDatalayer(true, "product");
if (typeof allProducts !== "undefined" && allProducts.length > 0) {
var result = "";
for (var i = 0; i < allProducts.length; i++) {
if ( typeof allProducts[i].shopify !== "undefined" ) {
result = findKey(allProducts[i].shopify, "currencyCode") || "";
if (result){
return result;
}
}
}
}
if(typeof oArgs.accountvars.currency !== "undefined") {
return oArgs.accountvars.currency;
};
return "";
}
```
Make sure to click the ‘**Add**' button.
Use this variable to replace the default Currency global variable in all the necessary Tags. If you are satisfied with the outcome, **publish your changes**.
### JENTIS Platform: Connect the CMP-Bridge
{% hint style="danger" %}
**The JENTIS CMP-Bridge** serves as a connector that transfers consent from the main website's consent banner via the Customer Privacy API to the Shopify Sandbox environment. This means you will still need to use your preferred CMP (e.g., Cookiebot) on the Shopify website and extend it with custom code to integrate the Customer Privacy API, as documented by your CMP vendor (e.g., [Cookiebot Shopify Installation Guide](https://support.cookiebot.com/hc/en-us/articles/360006184253-Shopify-installation)).
{% endhint %}
In the JENTIS Shopify CMP-Bridge, you need to configure which vendors are linked to specific Customer Privacy API groups as passed by your original CMP vendor on the page. This ensures proper consent synchronization and adherence to your privacy configuration.
1. Open your JENTIS platform and navigate to **Legal Hub** → **Consentbars.**
2. Connect the **Shopify** CMP-Bridge with the **container**.
3. Afterward, open the corresponding vendors under **Legal Hub** → **Vendors** and edit the CMP-Settings.
1. Predefined Vendor Categories are analytics, marketing, and preferences.
## Events tracked by the Shopify Plugin
The Shopify Plugin automatically tracks the following events:
* `pageview`
* `search`
* `cartview`
* `productlist`
* `productview`
* `addtocart`
* `removefromcart`
* `checkout`
* `order`
This comprehensive tracking allows you to gain valuable insights into your Shopify store's performance.
## Q\&A
### Why is JENTIS Preview Mode not working?
To run the preview mode, copy and paste your debug link from the preview session into the browser and execute it. After the page has loaded, remove all preview link URL parameters and reload the page. The preview should now load correctly. If not, please reload the page again.
### How to access the custom\_event information?
We have added a property called 'shopify' to all JENTIS DataLayer commands. This property contains the original event information passed from Shopify. If certain information is not provided in the default JENTIS DataLayer, you can access the 'shopify' property to retrieve the necessary details yourself.
### Why is the tracked URL different from what I see in my browser?
As Shopify Custom Pixels are placed in separate sandbox environments, the URL provided for each event will be different to the one you see in your browser's address bar. E.g.,
`document.location.href = "https://yourshop.myshopify.com/web-pixels@0e8c7c7aw41bd75a1p837d7fd4m8b145375/custom/web-pixel-129040453@22/sandbox/modern/collections/all"`
However an easy solution is to create a `Get JTM data layer value` variable to return the correct URL: `shopify.context.document.location.href`
We recommend enabling the `Full JENTIS Data Layer Lookback` feature for this variable. This will ensure that the URL continues to appear in events occurring after the page view, even if Shopify does not provide the URL parameter in the event data.
### How to access the JENTIS dataLayer (\_jts) in the developer console?
As mentioned before, Shopify Custom Pixels are placed in separate sandbox environments. This means that executing any command in the developer console won't directly interact with the custom pixel.
First we need to know in which sandbox our pixel resides. To do that, it's best to add some sort of a `console.log()` inside our Shopify Custom Pixel (e.g., at the end of the pixel code). E.g.,
`console.log('%c[JENTIS pixel]', 'color:#e91e8c;font-weight:bold', 'sandbox loaded');`
Then, click on the link on the right side which should lead you to the `Sources` tab in your dev tools. Once you do that, you should see the sandbox name starting with `web-pixel-sandbox(...)`.
All you need to do now is go back to the `Console` tab and select the correct context by clicking on the drop-down menu at the top. It should say `top` by default.
Verify whether you have selected the correct one by typing in `_jts` .
### **Can I access the payment method during checkout?**
No, the payment method can only be accessed during the checkout\_completed event.
***
If you have any questions or suggestions, contact us through our [Helpdesk](https://jentis.atlassian.net/servicedesk/customer/portal/1/group/1/create/220).
---
# Agent Instructions
This documentation is published with GitBook. GitBook is the documentation platform designed so that both humans and AI agents can read, navigate, and reason over technical content effectively. Learn more at gitbook.com.
## Querying This Documentation
If you need additional information that is not directly available in this page, you can query the documentation dynamically by asking a question.
Perform an HTTP GET request on the current page URL with the `ask` query parameter, and the optional `goal` query parameter:
```
GET https://docs.jentis.com/data-capture/shop-system-setup/shopify.md?ask=&goal=
```
`ask` is the immediate question: it should be specific, self-contained, and written in natural language.
`goal` is optional and describes the broader end goal you are ultimately trying to accomplish on behalf of the user. GitBook uses it to tailor the answer towards what is most useful for that goal.
The response will contain a direct answer to the question and relevant excerpts and sources from the documentation.
Use this mechanism when the answer is not explicitly present in the current page, you need clarification or additional context, or you want to retrieve related documentation sections.