> For the complete documentation index, see [llms.txt](https://docs.jentis.com/llms.txt). Markdown versions of documentation pages are available by appending `.md` to page URLs; this page is available as [Markdown](https://docs.jentis.com/data-activation/connectors/google-ads/google-ads-enhanced-conversion-configuration-guide.md).
# Google Ads Enhanced Conversion Configuration Guide
Enhanced Conversions improves Google Ads conversion matching with consented first-party data.
It can recover conversions that would otherwise remain unmatched. It also provides stronger signals for Smart Bidding.
Use this guide when configuring the JENTIS Google Ads server-side conversion tag template.
### Before you start
Send enhanced conversion data only where your legal basis and consent configuration permit it.
Google requires each PII identifier to follow this routine when conversions are sent as offline conversion imports, via Google Ads API or via JENTIS Server Side tags:
```
Trim → lowercase → SHA-256 → Base64URL encode
```
Do not send plaintext identifiers when configured with JENTIS Server Side tags.
The following enhanced matching identifiers must be hashed with Google Ads:
* Email-Address
* First/last name
* Phone number
### Step 1: Enable Enhanced Conversions in Google Ads
1. In Google Ads, select **Goals → Conversions → Summary**.
2. Select the conversion action that receives the enhanced conversion data.
3. Select **Edit settings**.
4. Open **Enhanced conversions** and select **Turn on enhanced conversions**.
5. Choose **Google tag** as the implementation method.
6. Select **API / Manual** when Google asks how you will provide user-provided data.
7. Save the conversion action.
Choose **API / Manual** for the JENTIS server-side implementation. Do not choose an implementation that requires browser-side automatic detection.
### Step 2: Prepare JENTIS variables
Create or update a JENTIS variable for each identifier you plan to send. You can push the according data via the [JENTIS data layer](/developer-guide/data-layer/jentis-data-layer.md):
For a text input, use:
```javascript
_jts.push({
track:"order",
order_email: "abc@def.com"
});
```
{% hint style="info" %}
You can also decide to push hashed values of any stage (SHA256 digest or the final Base64URL encoded value). See the next section how to configure your JENTIS Tag Manager Tags based on the format you have at hand.
{% endhint %}
With such data layer implementation you must now create a JENTIS Variable. Which must point to the key you decided to use with your data layer push call. In the above example we use the `track` command "order" and the parameter key is `order_email`.
Accordingly the variable is configured for this example:
Now you can access the email input in context of an order-event.
### Step 3: Map variables in the Google Ads tag
1. Open the JENTIS Google Ads tag where you want to use enhanced matching parameters.
2. Open the **Enhanced Conversions** tab.
3. Map each prepared variable to its matching enhanced conversion field.
4. Apply wrapping functions where needed to create the required final output format: Base64 encoded SHA256 output.
Map the normalized value to **Email** and apply the appropriate wrapping function to format the value. Map other allowed identifiers to the relevant **PII** fields.
#### Handling different value formats
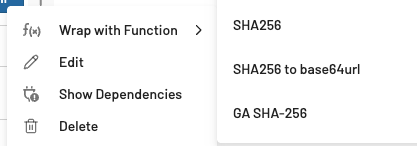
JENTIS provides all necessary default wrapper functions to apply the necessary encoding or encryption:
Please decide upon your use case which to use:
* Input is plain text\
⇒ Use "GA SHA-256", it will apply necessary formatting and encoding to match Googles requirements.
* Input is SHA-256 value\
⇒ Use "SHA256 to base64url", this will translate the already hashed value to the requested Base64 encoded value for transportation.
Do not hash an already SHA-256-hashed identifier again. Do not wrap a value that is already Base64URL-encoded.
### Step 4: Validate in the JENTIS Debugger
1. Start a JENTIS debug session.
2. Complete a conversion with a consented test user.
3. Open the Google Ads tag request.
Confirm that the request contains the expected parameter value in Base64 URL encoded format. Its value must be Base64URL-safe:
* It contains no `+` or `/` characters.
* It contains no trailing `=` padding.
* It is not readable as the original email address.
---
# Agent Instructions
This documentation is published with GitBook. GitBook is the documentation platform designed so that both humans and AI agents can read, navigate, and reason over technical content effectively. Learn more at gitbook.com.
## Querying This Documentation
If you need additional information that is not directly available in this page, you can query the documentation by asking a question.
Perform an HTTP GET request on the following URL with the `ask` and `goal` query parameters:
```
GET https://docs.jentis.com/data-activation/connectors/google-ads/google-ads-enhanced-conversion-configuration-guide.md?ask=&goal=
```
`ask` is the immediate question: it should be specific, self-contained, and written in natural language.
`goal` is what the user is ultimately trying to achieve, the reason they need the answer. Sharing it helps GitBook give you a better, more relevant answer. A goal is most helpful when it describes the outcome the user wants rather than restating the question. For example, with `ask=how do I create an API token`, a goal like `automate deployments from our CI pipeline` lets GitBook tailor the answer to that use case.
The response will contain a direct answer to the question and relevant excerpts and sources from the documentation.
Use this mechanism when the answer is not explicitly present in the current page, you need clarification or additional context, or you want to retrieve related documentation sections.