> For the complete documentation index, see [llms.txt](https://docs.jentis.com/llms.txt). Markdown versions of documentation pages are available by appending `.md` to page URLs; this page is available as [Markdown](https://docs.jentis.com/data-activation/connectors/diy-tool/how-to-configure-your-diy-tool.md).
# How to configure your DIY Tool
Sometimes there is just no perfect match for some very specific or custom requirements. So a simple and generic tool won't do it for you? For that we have a DIY customization tool. There you can simply add image-pixels or S2S connections on HTTP level. In this guide we will quickly run through the configuration, add some sample tags and describe the possible configuration options you have at hand here.
First we need to add this tool to a JTM configuration. In Tools (top level navigation of your JENTIS Data Capturing Platform) you must add a new tool instance clicking the "Add New Tool" button, in the list of available tools select the JENTIS DIY Tracking Tool and add it.
Give the added tool instance a descriptive name and select the container (website) on which it will operate.
Remember to also select an appropriate vendor in the advanced settings for the DIY connector you configured. The DIY connector you create must also resolve consent appropriately, which is handled in the "Legal Hub" section and you can add custom vendors for your custom DIY-connector, too.
Now this new tool allows us to create custom data streams to a dynamic endpoint. Those are tags with customizable properties. So let's add a new tag in your JENTIS Tag Manager now that accompanies our newly added tool:
In the "Select Tool" step choose the tool you just installed.
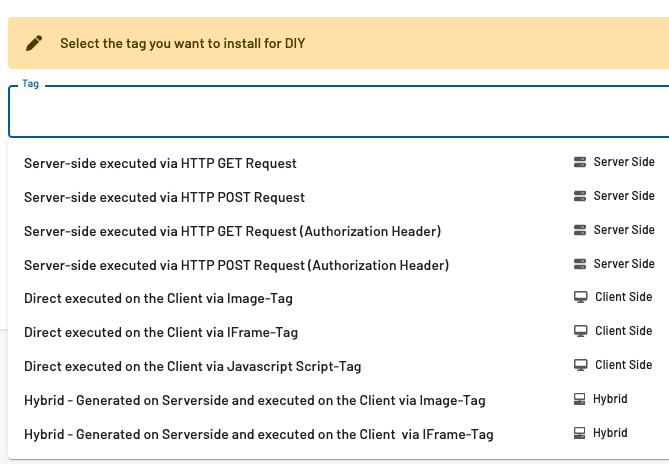
For the template you have the following options currently:
* Client Side tags (creates an iframe, image or script tag)
* Server Side Executed Tags (HTTP GET or POST Request via JENTIS Server)
* Hybrid Tags (creates an iframe or image on client, the configuration however happens sever side)
In the last two steps, you can select a trigger, as with all other tags in the JENTIS Tag Manager, and configure the parameters you want to send.
Here, you need to define the target URL address (starting with http) and your parameters that should appear in the payload or query string.
Based on your configuration, JENTIS will now activate this data stream on client or server side with the parameters of your choice.
---
# Agent Instructions
This documentation is published with GitBook. GitBook is the documentation platform designed so that both humans and AI agents can read, navigate, and reason over technical content effectively. Learn more at gitbook.com.
## Querying This Documentation
If you need additional information that is not directly available in this page, you can query the documentation by asking a question.
Perform an HTTP GET request on the following URL with the `ask` and `goal` query parameters:
```
GET https://docs.jentis.com/data-activation/connectors/diy-tool/how-to-configure-your-diy-tool.md?ask=&goal=
```
`ask` is the immediate question: it should be specific, self-contained, and written in natural language.
`goal` is what the user is ultimately trying to achieve, the reason they need the answer. Sharing it helps GitBook give you a better, more relevant answer. A goal is most helpful when it describes the outcome the user wants rather than restating the question. For example, with `ask=how do I create an API token`, a goal like `automate deployments from our CI pipeline` lets GitBook tailor the answer to that use case.
The response will contain a direct answer to the question and relevant excerpts and sources from the documentation.
Use this mechanism when the answer is not explicitly present in the current page, you need clarification or additional context, or you want to retrieve related documentation sections.